Archives for category: budget ideas

20120810-081526.jpg

After living four years in our travel trailer, I came to understand that storage was very important. If it didn’t comfortably fit in the cabinet, it had to go. One item that was not allowed was a full size toaster. For such infrequent use, it was given away.

Growing up my mom and dad always had this sort of flip up toaster with us during camping trips. It stores flat and works on electric and propane ranges.
20120810-081554.jpg

20120810-102424.jpg

The toaster worked great for me while living in the trailer (260 sq. ft.) as well as living in our new house (which is 980 sq. ft.). It doesn’t take up counter space and handy enough to use a couple times a week. The toaster costs appx. $6, not bad, and takes about 5 minutes to toast 4 halves of bagels.
20120810-081616.jpg

20120807-214001.jpg

I was on the site: Organizing Home Life the other day and Ginny, the author, made a post about labeling your leftovers in the fridge using dry erase crayons. *Go to her site here*
Dry erase crayons?! I didn’t even know these existed! After all these years (ok, only about 2) I’ve had to suffer the effect of letting my oldest daughter learn to yield a dry erase marker, getting it all over her hands and things. Crayons are great, dry erase crayons? Even better.

So anyways, I bought a pack of dry erase crayons and found that in addition to being able to write on Pyrex lids, I could write on other things too. Think of some of the benefits. Remember seeing those trendy drinking glasses in the store with the bit of chalkboard paint on them so you can use chalk to label your glass? Well now you can use the glasses and cups you already own. When you’re ready to label things you can mark drinking glasses, wine glasses, plastic cups, glass bowls, heck, I even wrote on my kitchen counter, windows, mirrors and coffee cup. Non-porous surfaces are the key. The crayon writing doesn’t rub off easily but with a little bit of water and a rag it wipes clean.

Trying to rub off with a dry rag

20120807-214038.jpg

Rubbing it off with a damp rag

20120807-214050.jpg

20120913-084446.jpg

Difficulty: Easy peasy. Materials needed: Sta-Flo liquid starch, Elmers Glue-All liquid Glue, food coloring, measuring cup (optional), spoon, bowl, scrap newspaper or paper towel, and a airtight jar of some sort for storing it.

This was a rewarding project to do outside with my 5 year old. It turned out just like store bought silly putty but even better because we got to make it.
Arrange your arsenal of supplies:

20120802-143916.jpg

Measure out the glue, we used a whole bottle.
20120802-143930.jpg

Add the food coloring… Pretty!
20120802-143940.jpg

Pour into bowl, then measure the exact same amount of Sta-Flo as you used Elmers Glue. We used a measuring cup because reading about other peoples silly putty adventures, getting equal amounts is key.
Pour Sta-Flo into the bowl now and stir.
20120802-144004.jpg

20120802-144012.jpg

Whoa! Looks crazy! Let it soak for about five minutes, stir again.
Take the gunk out and let sit on newspaper or paper towel for a couple minutes to drain off extra liquid.
20120802-144020.jpg

Then squeeze and press the stuff till it resembles silliness.
20120802-144030.jpg

And then play.
20120802-144046.jpg

20120802-144054.jpg

20120802-144104.jpg
This putty is such a cool texture, it stretches and melts but doesn’t leave visible residue on hands or table. Note that if for whatever reason water or liquid gets on it, it will make a horrible mess! Keep it dry for sure.
Store in an airtight container and enjoy day after day.
For a birthday present idea, put the putty in a cool container, and throw in a couple of google-y eyes. For a batch that made about a cup of putty, it cost around $2.37, add $1 for a latch top airtight glass from the dollar store and you’ve got a unique fun gift to give for under $5.

You know how it goes, you spend forever scouring your glass shower door yet those stubborn water stains don’t come off. Not even a little bit.
Well it seems as though a tip passed through a mom to her daughter to her friend to her friends daughter in law to you has saved the day!!
[Cue dryer sheet and applause]

20120802-094231.jpg

That’s right, try using a dryer sheet and watch the stains go away. I purchased this box of dryer sheets for .97 and you get 40 sheets. That’s two pennies a sheet, not bad.

For those non believers out there I took a before and after picture of a jar that had held my soap bars in my shower for about 2 months. All the dish soap and scrubbing would not get the stains off.
Before
20120802-094247.jpg

After
20120802-094255.jpg

Thank you Lila for the tip!

Note: I recommend wearing gloves of course, as with any other cleaner.

So my daughter wanted some pasta a while back and we weren’t at home. We swung by the deli isle in Safeway and picked up a tiny portion of Chicken caesar pasta salad and she ate it on the way home. So later, I’m picking up trash from the day and see this long, long, long label staring back at me!

20120729-211330.jpg

Just crazy if you ask me. So today I took a crack at the same pasta dish but with a little less ingredients. The pasta wasn’t the most amazing ever, maybe because it was whole wheat… but the caesar dressing was awesome!!
I like to double my efforts so I at least double recipes. Here is the dressing recipe.
Caesar Salad Dressing:
6 cloves garlic
1 1/2 cup mayo
4 TBSP parmesan cheese
2 tsp worcestershire sauce
2 tsp dijon mustard
2 TBSP lemon juice

Blend and chill
Full recipe here

The ingredients in my pasta caesar salad was 16 oz. whole wheat pasta, 1 cup roasted shredded chicken, romaine lettuce. I left the Safeway recommended sodium nitrate out. Goodness.
20120729-211428.jpg

Rated: Slightly difficult, worth the time
Materials needed: A highchair, an unused banner destined for the garbage can, needle and thread and/or sewing machine, and about two hours of time to kill

20120727-200530.jpg

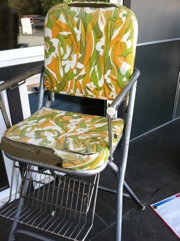
My high chair was a yardsale find and I really liked the cushion but it was all cracked with age 20120727-200617.jpg

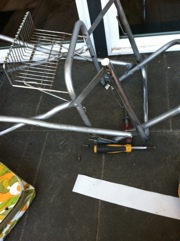
I took the pads off…20120727-200629.jpg

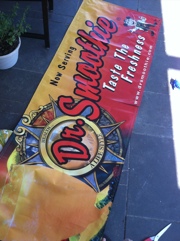
And this is the banner I inherited. Ask around local small businesses if you’re in need of a banner
20120727-200643.jpg

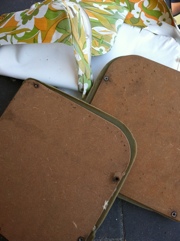
I tore off the old vinyl and used the boards as a template for cutting my new vinyl. Traced and cut out20120727-200709.jpg

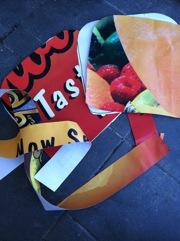
Don’t forget the edge strip.20120727-200728.jpg

20120727-200753.jpg

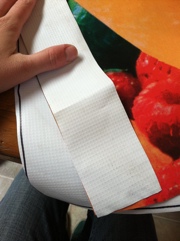
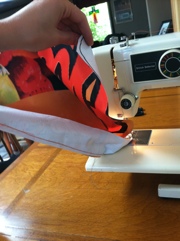
When sewing the vinyl edges together, take time to make sure that you are sewing the backside together. I messed up and had to take my thread out and redo it. The idea is that by sewing it inside out, that when you flip it right side out that the lines are super clean with no visible thread. I recommend reinforcing the thread by making a couple passes through the sewing machine, especially in the corners.20120727-200831.jpg

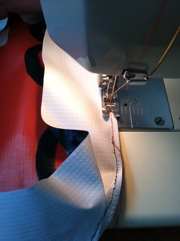
So this is what the put together pieces would look like. There is ONE piece not sewed shut, if you sew it shut, you won’t be able to get your cushion in!! 😀 Luckily this did not happen to me but it was definitely a possibility.20120727-200848.jpg

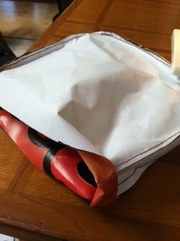
Now man handle it so that the pretty side is seen.20120727-200907.jpg

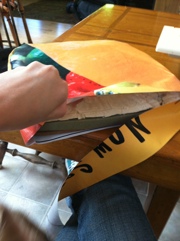
Time to put the cushion back in and hand stitch it shut. I chose to have my hand stitch facing the back of the high chair so you wouldn’t really see it.20120727-200935.jpg

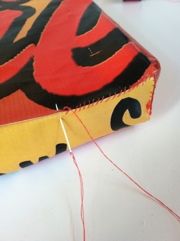
Hard parts over! Time to put it back where it belongs.20120727-200953.jpg

20120727-201157.jpg
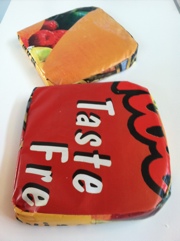
And there you have it, totally unique highchair and actually saved me spending $18 at the fabric store.

20120715-083439.jpg
Sweet tea: A refreshing and sweet beverage to enjoy on a hot summer day. It can also be an extra expense at the mini mart checkout before you head out to the lake. A cheap can will cost you at a minimum $1 and for a higher end black tea in a glass bottle about $3. Judging from the taste of the cheap stuff, the only reason we buy it is because it’s convenient (and $1).
With just a little bit of pre-planning, you can get a better quality sweet tea for .19 a bottle.
Buy a pack of 12 pint size glass jars with lids, a pack of 100 Lipton tea bags, and a 5 lb. bag of sugar. Fill jars with water, add one tea bag, lid it and sit in sun just till heated. Bring in, remove lid, wring tea bag out into the jar it came from, add one TBSP of sugar, put lid on, shake and put in fridge. You’ll have 12 bottles of sweet tea waiting for you to grab and go to your destination, which might just be on your back porch.
For you nerds who want to see the math:

20120715-083945.jpg
Have a relaxing summer everyone!

20120713-213716.jpg
What an amazing birthday present my husband Stewart made me this year. At the time, we were still living in the trailer which happened to be right next to our new house which was under construction. He was working hard on the house to get us moved in, focusing only on the important things like power, water, etc. Porch lights were not on the list. He knew I was all about the fun part, the finishing touches, so he put the lights all together, hung them and made them operate so I could enjoy them on my birthday. I absolutely love them.

20120713-213747.jpg
Creating these lights weren’t dirt cheap. One light cost about $80 in materials: wiring, galvanized bucket, chicken heater bulb guard. However, if you could find a used bucket at a yardsale, you could drop the price down to where it would be rather cheap.
20120713-213756.jpg
A happy day it was.

20120713-170922.jpg
I’m a big fan of flor brand carpet tiles. I love the prints, colors, everything. Everything except for the price! For one 18″ x 18″ carpet tile, you’re going to pay about $14. I had saved up some money and paid for some great bright squares for the girls’ room but couldn’t afford the living room, except for two measly squares (for motivation). So anyways, I found myself at a dollar store killing time while my husband was shopping next door and happened upon a pleasant surprise.
A stack of some 18″ x 18″ carpet tiles! I’m not saying I found the holy grail of carpet tiles, I did say this was a DOLLAR store, right? But I am so excited that I got ten carpet squares for less than the price of one from Flor. Wow. Should I be embarrassed? Ha.

20120713-170832.jpg
If you’re curious which two tiles were the expensive ones… One is the far right top and the other is the far left bottom.

20120713-170912.jpg

20120713-170932.jpg
And just for comparisons sake, the left tile is dollar store and the right is Flor.

After 4 years living in our 30ft. Travel trailer, our house was complete and ready for us to move in! Well, complete is a sort of vague term when you do all the work yourself I guess. We had no bathroom mirrors, no mirrors at all actually. We had decided to stop spending money on the house so… What to do?

20120713-153124.jpg

I have to say, there may be a cult following of faux gold framed mirrors somewhere in the world but I’m in no such cult. I picked up two of these badboys for $1 each. I bought a can of satin black spray paint for $7 (overpriced, I know) and had at it.

20120713-153208.jpg
20120713-153234.jpg
My husband helped me hang them with wire and some mounting tape and I’m way happy with the results.

20120713-153258.jpg
Yay for mirrors!